How to Use a GitLab Runner with Machine Driver and Object Storage
Traducciones al EspañolEstamos traduciendo nuestros guías y tutoriales al Español. Es posible que usted esté viendo una traducción generada automáticamente. Estamos trabajando con traductores profesionales para verificar las traducciones de nuestro sitio web. Este proyecto es un trabajo en curso.
GitLab Runners runs tasks within your GitLab continuous-integration (CI) pipeline. Runners can clone your project, spin up needed machines, and execute the necessary steps for building, testing, and deployment stages. And GitLab Runners can use autoscaling for provisioning, spinning up servers only when they are needed.
Follow along with this guide to learn more about GitLab Runners and how they fit into a GitLab CI/CD infrastructure. See how to set up your GitLab instance for CI/CD and register a GitLab Runner Manager. Learn the steps for effectively configuring your GitLab Runner and executing tasks as part of a GitLab CI pipeline.
Additionally, this guide covers how to integrate your GitLab Runner setup with Linode Object Storage. Doing so gives you a more efficient storage option for caching resources between GitLab jobs.
What Are GitLab Runners?
A GitLab Runner performs jobs as part of GitLab CI/CD pipelines. Each runner picks up jobs from the GitLab CI coordinator, according to the runner’s scope. The runner then executes the instructions in that job, whether for building a project, testing changes, or deploying a built project.
One feature that makes GitLab Runners particularly useful is their ability to spin up machines to run tasks on. At their simplest, runners can execute some shell commands and feed the results back to GitLab. But more often runners are used to set up your project on a machine with a Docker container. There, runners can readily build and test projects in a dedicated environment.
Using Docker to execute jobs makes it relatively easy to have your runners pull down images for dependencies. You can more consistently get the right versions and environment setup to fit your needs.
GitLab Runners can also implement an autoscaling configuration. This uses Docker Machine to provision server resources on demand, only providing as many resources as you need at a given time. Each machine comes ready with Docker for building, testing, and otherwise preparing your project.
How to Create a GitLab Instance and Install a GitLab Runner
To use GitLab Runners, you need a GitLab instance where your project lives and where your pipeline operates. This guide uses a self-hosted GitLab instance, with a dedicated section on setting up your instance.
You can also use a GitLab SaaS (GitLab.com) instance. The steps for the GitLab Runner setup should be similar, so skip ahead in that case. You can learn more through the GitLab documentation linked at the end of this guide.
Create a GitLab Instance
With Linode, you have three options effective for creating your own self-hosted GitLab instance.
Use the Linode Marketplace to deploy a ready instance with GitLab installed. This method requires the fewest manual steps and provides the surest and quickest way to get a GitLab instance running. You can follow along with our Deploy Gitlab through the Linode Marketplace guide.
Use the default package manager for your Linux distribution. GitLab maintains official installation packages for CentOS, Debian, Ubuntu, and others, and you can follow the instructions in their official documentation. You may also refer to our Install GitLab on Ubuntu 18.04 for additional details on the installation process.
Use Docker to deploy your GitLab instance. This option requires the most effort and setup. But the option can be a boon for those familiar with Docker and wanting the benefits of a containerized instance. You can follow our Install GitLab with Docker guide to set up your GitLab instance with Docker.
The rest of the guide assumes you have your GitLab instance up and running. This guide uses an instance deployed through the Linode Marketplace, but the steps should be compatible with any of the options above.
Create an Instance for GitLab Runners
GitLab recommends that you run your instance of GitLab and your GitLab Runners on separate machines. This provides better performance and security for your infrastructure.
The dedicated instance you use for your GitLab Runners is referred to as the Runner Manager. All subsequent installations and configuration instructions in this guide take place on the Runner Manager unless stated otherwise.
These next steps refer you to guides for creating, updating, and securing a new Linode Compute Instance, where you can install the GitLab Runners. Follow them before going forward with the rest of this guide.
Create a Linode Compute Instance. See our Getting Started with Linode and Creating a Compute Instance guides.
Follow our Setting Up and Securing a Compute Instance guide to update the instance. You may also wish to set the timezone, configure your hostname, create a limited user account, and harden SSH access.
sudo. If you’re not familiar with the sudo command, see the
Linux Users and Groups guide.Install GitLab Runner
Once you have an instance up and ready, you can follow the steps here to install the GitLab Runner software. This gives you a command-line interface for registering and managing your GitLab Runners.
Add the GitLab repository to your instance’s package manager.
On Debian and Ubuntu distributions, use the command below:
curl -L "https://packages.gitlab.com/install/repositories/runner/gitlab-runner/script.deb.sh" | sudo bashOn CentOS and Fedora distributions, use the command below:
curl -L "https://packages.gitlab.com/install/repositories/runner/gitlab-runner/script.rpm.sh" | sudo bash
On Debian distributions, you should additionally pin the GitLab repository for your GitLab Runner installation. This ensures that the APT package manager uses the GitLab Runner version from the GitLab repository.
You can use the command below provided by GitLab to pin the repository.
cat <<EOF | sudo tee /etc/apt/preferences.d/pin-gitlab-runner.pref
Explanation: Prefer GitLab provided packages over the Debian native ones
Package: gitlab-runner
Pin: origin packages.gitlab.com
Pin-Priority: 1001
EOF
Install the GitLab Runner software from your instance’s package manager.
On Debian and Ubuntu distributions, use the APT command.
sudo apt install gitlab-runnerOn CentOS and Fedora distributions, use the DNF command.
sudo dnf install gitlab-runner
Check your installed GitLab Runner version to verify successful installation.
gitlab-runner --versionVersion: 15.8.0 Git revision: 12335144 Git branch: 15-8-stable GO version: go1.18.9 Built: 2023-01-19T03:18:22+0000 OS/Arch: linux/amd64
How to Configure a GitLab Runner
You are now ready to set up a GitLab Runner. At the simplest, this just means registering a runner, which you can do by following the first section below. Registration associates the runner with your GitLab instance, where you can configure CI/CD pipelines to use the runner.
Your runner is ready to use immediately afterward using the default configuration. However, you may want to fine-tune that configuration, especially as you start using your runners for actual projects and more advanced pipelines.
The second section below details where you can start configuring your GitLab Runners. The section provides some resources for learning more about possible configurations, and it highlights some useful options for autoscaling setups.
Further on in the guide, you can see some example modifications to the default configuration. These specifically cover enabling autoscaling and implementing Linode Object Storage for caching.
Register the Runner
To create a runner, you need to register it with a GitLab instance. This involves getting a GitLab Runner token from your instance and running the register command with that token from within your Runner Manager instance.
Access the GitLab administrator interface for your GitLab instance. You can follow the guide above on setting up a GitLab instance to see how to access the interface through your web browser.
Procure a runner token from the GitLab instance’s interface. How exactly you do this depends on the desired scope for the runner. These scopes, along with the methods for getting their tokens, are outlined below. Learn more about runner scopes in the GitLab documentation.
A shared runner operates across the entire GitLab instance, between groups and projects. It can be useful when you have similar tasks across projects.
To get the token for a shared runner, navigate to Admin from the upper-left menu. Then choose Overview > Runners from the left menu, and select the Register an instance runner button from the upper right.
A group runner operates within a particular group on your instance. Similarly, this works well when projects within the group share similar tasks.
To get the token for a group runner, use the menu at the upper left to navigate to the group’s page. Then choose CI/CD > Runners from the left menu, and select the Register a group runner button from the upper right.
A specific runner operates within a given project. Such a runner is most useful when that project has specific task needs or when its tasks are performance intensive and would benefit from a dedicated runner.
To get the token for a specific runner, use the menu at the upper left to navigate to the project. You can either navigate directly to the project or find the project on the associated group’s page. Then choose Settings > CI/CD from the left menu, and go down the page to expand the Runners section. There you can find the token under a Specific runners subheading.
This guide uses a shared runner and follows the method described above to procure its token.
Run the command below to start registering the GitLab Runner. The GitLab Runner application gives you a series of prompts, for which you need the URL for your GitLab instance and the runner token you retrieved in the previous step.
sudo gitlab-runner registerRespond to the series of prompts, entering your GitLab instance’s URL and the runner token when asked in the first two prompts. The application also prompts you for an executor. You can modify this later, so for now respond with
shell.You can respond to the remaining prompts as fits your needs. For the runner description, you can use whatever values suit you, and the same or a blank for the tags and maintenance notes.
The process creates a configuration file for the runner and outputs the file’s location when the runner has been created. Typically that location is
/etc/gitlab-runner/config.toml, and you can review — or modify — that file as you need.Note In registering the runner as a root user (viasudo), you may need to use root permissions to access the configuration file.Use the GitLab Runner
verifycommand to verify the runner. This establishes a first contact between the GitLab instance and the GitLab Runner.sudo gitlab-runner verifyVerifying runner... is alive runner=wCG_zeGX
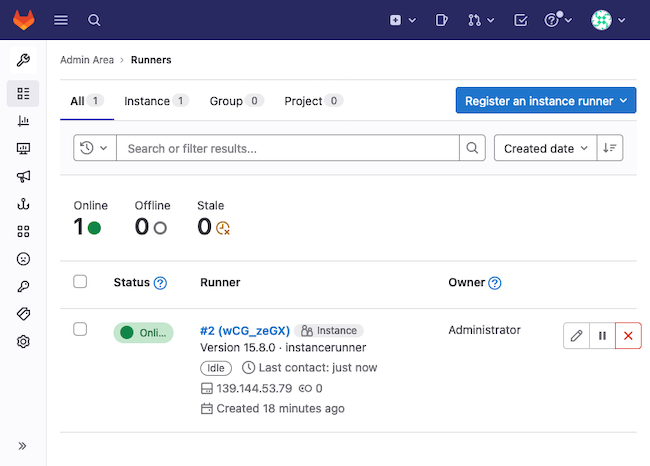
At this point, you can return to the administrator interface for your GitLab instance and find the new runner listed. Since this guide uses a shared runner, you can find the runner listed under Overview > Runners from the Admin menu.
Configure the Runner
The config.toml file created when you registered the runner in the previous step holds your runner’s configuration. Within this file, you have access to global options, outside of any heading, and individual runners, each defined by a [[runners]] section heading.
The registration process creates a simple default configuration. And for many use cases that configuration is sufficient. But for some more advanced usages or for adjusting the executor for your runner, you may want to modify these defaults to fit your needs.
The range of options is extensive, allowing you to adapt runners to a wide range of needs. For full coverage of options, you should refer to GitLab’s advanced configuration guide.
The following covers some of the most important configuration options for autoscaling GitLab Runners, which the upcoming sections of this guide focus on. You can also learn more about these in GitLab’s guide on autoscaling GitLab Runners.
The global
concurrentoption defines how many jobs the runner can execute simultaneously. For an autoscaling runner, you likely want this at a higher number than the default1. GitLab gives an example with100.The
[[runners]]section can have alimitoption. This option determines how many jobs the runner can have going simultaneously. For an autoscaling runner, this option effectively limits the number of machines the runner can have up at any given time.The
[[runners.machine]]subsection has several useful options related to idling machines. These control whether and how many machines the runner should keep idling, available for use by jobs.On its own, the
IdleCountoption specifies how many machines the runner should maintain in an idle state. Such idling machines can be picked up quickly by the runner to execute jobs.Setting
IdleCountto0has the runner only create machines on demand, as needed. After the runner is finished using the machine, the machine stands idle for the duration ofIdleTime, waiting to be picked up by other jobs. Following theIdleTime, the machine is removed.
Test Your GitLab Runner
Even with the default configuration you get from the registration section above, you can already see your GitLab Runner in action. Follow the steps here to set up a simple project and pipeline for the runner to act on.
From your GitLab instance interface, create a project. You can do so by selecting Projects > View all projects from the upper-left menu and then selecting New project at the upper right. You can also similarly create a group first to associate the project with.
This example creates a project named
example-projectwithin anexample-group. The project is initialized blank.Create a
test-content.txtfile within the project’s base directory. Give the file some text content to display during the testing phase. This example usesThis is a test message for the CI/CD pipeline..Create a file with the CI pipeline script for the project. GitLab needs this file to be named
.gitlab-ci.ymland for it to be stored in the project’s base directory. This example gives the file the contents shown here.- File: .gitlab-ci.yml
1 2 3 4 5 6 7 8 9build-job: stage: build script: - echo "Built!" test-job-1: stage: test script: - cat test-content.txt
This pipeline script creates two jobs:
A build job that outputs the text
Built!A test job that outputs the content of the
test-content.txtfile
You can learn more about crafting GitLab CI/CD pipeline scripts in GitLab’s official tutorial.
Once you commit this file to the project, the pipeline gets created. GitLab automatically has any available runners pick up the pipeline job.
Navigate to your project within the GitLab instance interface, and select CI/CD > Pipelines from the left menu.
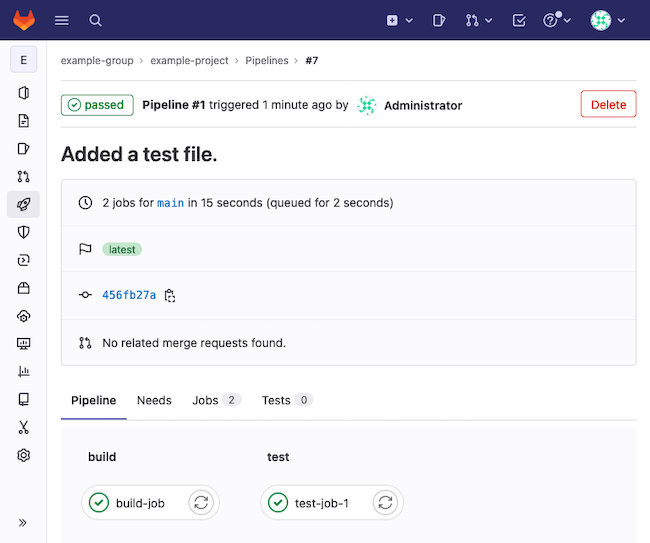
You should see a pipeline item for the recent commit. Select that item via the status icon, which should indicate passed at this point. The pipeline’s page shows the associated jobs,
build-jobandtest-job-1using the configuration example above.Select each job in turn to see the job’s output. For the
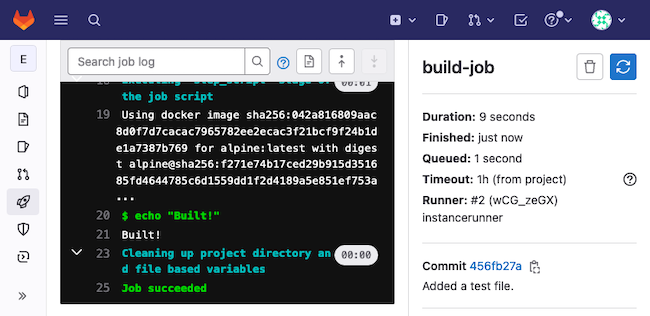
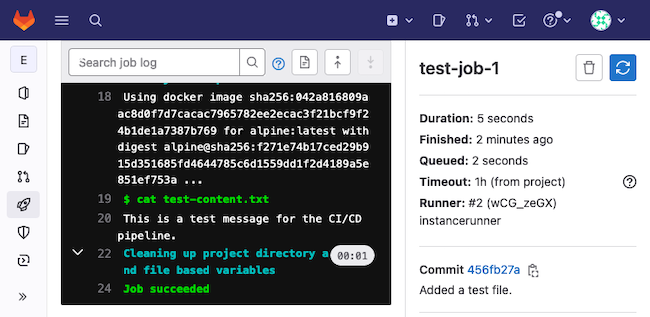
build-jobthat would beBuilt!, and for thetest-job-1that would be the contents of thetest-content.txtfile.
How to Set Up an Autoscaling GitLab Runner
You now have a working runner, which is actively picking up CI/CD pipeline tasks from your GitLab instance. This can be adapted to use a number of different executors, including Docker for running more advanced pipeline jobs.
One of the GitLab Runners’ most compelling offerings is an autoscaling setup, with the runners spinning up machines as needed to run tasks.
To prepare your GitLab Runner Manager for this, you need some additional setup. By the end of this section of the guide though your instance can have an autoscaling runner with Docker Machine.
Install Docker and Docker Machine
GitLab Runners use Docker Machine to create machines for autoscaling pipeline execution. Docker Machine allows runners to create machines only as needed, making for a more efficient setup. Each machine, in turn, runs the given build, test, and deployment commands from your GitLab CI/CD pipeline.
Your Runner Manager thus needs to have both Docker and Docker Manager installed to support autoscaling. Follow these steps to get these installed and running. Additionally, Docker Machine needs to interface with Linode, so these instructions include installation of the Linode Docker Machine driver.
Follow our Installing and Using Docker guide to set up Docker on your Runner Manager instance. Use the dropdown at the top of the guide to select the appropriate distribution for your instance.
Use the commands here to download the Docker Machine executable, move it to your instance’s path, and give it executable permissions.
curl -O "https://gitlab-docker-machine-downloads.s3.amazonaws.com/v0.16.2-gitlab.11/docker-machine-Linux-x86_64"
sudo mv docker-machine-Linux-x86_64 /usr/local/bin/docker-machine
sudo chmod +x /usr/local/bin/docker-machine
Verify both installations with the following commands.
docker --version
docker-machine --version
Docker version 20.10.22, build 3a2c30b docker-machine version 0.16.2-gitlab.11, build b09ad09fFinally, install the Linode Docker Machine driver to support the Docker Machine’s provisioning of Linode instances. Locate the latest release from the releases page, then identify the package appropriate for your system.
This example uses version 0.1.9 and the x86_64 package for Linux. The commands here download that package, unpack its contents, and move those contents onto the path. Just replace the URL and filename with those for the package you identify.
wget https://github.com/linode/docker-machine-driver-linode/releases/download/v0.1.9/docker-machine-driver-linode_0.1.9_Linux_x86_64.tar.gz
tar -zxvf docker-machine-driver-linode_0.1.9_Linux_x86_64.tar.gz docker-machine-driver-linode
sudo mv docker-machine-driver-linode /usr/local/bin/
Configure the GitLab Runner for Autoscaling
Your GitLab Runner needs some changes to its configuration now to support autoscaling. The runner needs to utilize Docker Machine as its executor and to indicate its machine provisioning settings.
Open the
config.tomlfile for your GitLab Runners, and locate the[[runners]]section corresponding to the runner you want to make autoscaling.Make the following changes within the configuration. You can see what these look like in the example snippet further on.
Within the main
[[runners]]section, change theexecutorvalue todocker+machine. This has the runner use Docker Machine to provision servers and execute tasks.Add a
[runners.docker]subsection to the runner, and give the section the contents shown in the snippet below. This example uses thealpineimage as the default, but you can replace this as fits your needs.Add a
[runners.machine]subsection, and give it the contents shown in the snippet. These define how your runner handles provisioning machines.The configuration here keeps two idle machines at any time, which can be picked up by any jobs needing them.
The
linode-options define how the Linode instances should be created. You need to replace<LINODE_API_TOKEN>with your actual Linode API token, which you can procure by following our Getting Started with Linode API guide.Otherwise, replace the values as desired. You can learn more about the options, along with links to possible values, in the Linode Docker Machine driver documentation
- File: /etc/gitlab-runner/config.toml
1 2 3 4 5 6 7 8 9 10 11 12 13 14 15 16 17 18 19 20 21 22 23 24 25 26 27[[runners]] # [...] executor = "docker+machine" # [...] [runners.docker] tls_verify = false image = "alpine:latest" privileged = false disable_entrypoint_overwrite = false oom_kill_disable = false disable_cache = false volumes = ["/cache"] shm_size = 0 [runners.machine] IdleCount = 2 IdleScaleFactor = 0.0 IdleCountMin = 2 IdleTime = 1800 MachineDriver = "linode" MachineName = "gitlab-runner-%s" MachineOptions = [ "engine-install-url=https://get.docker.com|head -n-1|cat - <(echo -e \"VERSION=19.03.9\\nCHANNEL=stable\\ndo_install\")", "linode-token=<LINODE_API_TOKEN>", "linode-region=us-southeast", "linode-instance-type=g6-standard-1", "linode-image=linode/debian10" ]
Restart your GitLab Runner instance for the changes to take effect.
sudo gitlab-runner restart
Test the Autoscaling GitLab Runner
Verifying your autoscaling setup works similarly to verifying your GitLab Runner setup overall. You can simply commit a change to one of the files in the example project created for the Testing Your GitLab Runner section above.
The CI/CD pipeline automatically creates new jobs for the runner to pick up. The runner has now been configured to provision machines to fulfill the jobs, but otherwise, you can see the results just as before.
Here, for instance, is what the results for the build-job might look like.
And here is what results for the test-job-1 might look like.
How to Enable Linode Object Storage on a GitLab Runner
GitLab Runners additionally can cache resources. Caching resources allows your pipelines to share the same files across multiple jobs.
You can learn more about the role of caching in GitLab CI/CD pipelines through GitLab’s documentation
To see this feature at work, you can use the following expanded version of the example pipeline script developed in the preceding sections.
- File: .gitlab-ci.yml
1 2 3 4 5 6 7 8 9 10 11 12 13build-job: stage: build script: - echo "Built!" test-job-1: stage: test script: - cat test-content.txt cache: key: test-cache paths: - test-content.txt
By default, cached files are stored locally alongside your GitLab Runner Manager. But that option may not be the most efficient, especially as your GitLab pipelines become more complicated and your projects’ storage needs expand.
To remedy this, you can adjust your GitLab Runner configuration to use an S3-compatible object storage solution, like Linode Object Storage.
These next steps show you how you can integrate a Linode Object Storage bucket with your GitLab Runner to store cached resources from CI/CD jobs.
Follow our Getting Started with Object Storage guide to enable Linode Object Storage, create a bucket, and get an access key.
This guide uses a bucket named
gitlab-example-bucketand was created in the Atlanta, GA region, designatedus-southeast-1.Access your GitLab Runner instance, and open the GitLab Runner configuration file.
Replace the placeholder
[runners.cache]and[runners.cache.s3]sections with the lines shown below. These enable S3 storage and provide the credentials for the GitLab Runner to use the Linode Object Storage bucket you created above.Replace
<LINODE_S3_ACCESS_KEY>and<LINODE_S3_SECRET_KEY>with the access key and the secret access key, respectively, for your Linode Object Storage instance.Replace
us-southeast-1in both theServerAddressandBucketLocationfields with the actual designation for your bucket’s location.Replace
gitlab-example-bucketwith your bucket’s actual name.- File: /etc/gitlab-runner/config.toml
 1
 2
 3
 4
 5
 6
 7
 8
 9
10
11
# [...] [runners.cache] Type = "s3" Shared = true [runners.cache.s3] ServerAddress = "us-southeast-1.linodeobjects.com" AccessKey = "<LINODE_S3_ACCESS_KEY>" SecretKey = "<LINODE_S3_SECRET_KEY>" BucketName = "gitlab-example-bucket" BucketLocation = "us-southeast-1" # [...]
Restart the GitLab Runner for the changes to take effect.
sudo gitlab-runner restart
Now cached files are stored in Linode Object Storage for any GitLab CI/CD pipelines associated with this runner.
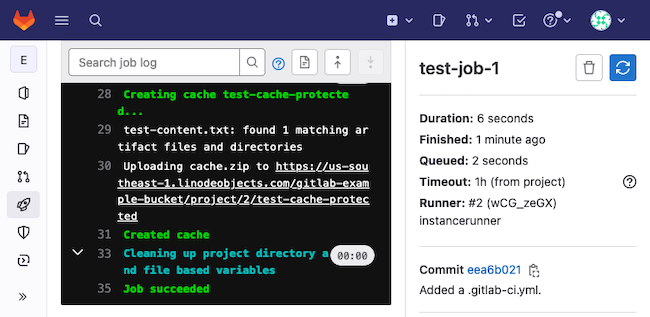
Using the pipeline script above and the example-project developed earlier in this guide, you can see this in action. Just commit a change to one of the project’s files. You can see the output on the page for test-job-1.
Conclusion
With this, your GitLab instance has a GitLab Runner setup ready to handle your CI/CD workloads. Whether you just need a basic runner or you intend to use autoscaling and S3 cache storage, this guide has the steps you need.
Be sure to refer to the GitLab resources provided throughout this guide, as well as the GitLab documentation linked at the end of this guide. GitLab has much more when it comes to working out the exact setup you need, with pipeline and runner features to fit your process. So keep learning and building on the infrastructure and configuration options this guide has walked you through.
More Information
You may wish to consult the following resources for additional information on this topic. While these are provided in the hope that they will be useful, please note that we cannot vouch for the accuracy or timeliness of externally hosted materials.
This page was originally published on

